In the last 2 blog postings you have learned how to setup your first Availability Group with SQL Server 2012. Today I want to show you how you can join an additional Replica to an existing Availability Group. When you have followed the last 3 blog postings, you should have now an Availability Group called TestAG that is spanned across the following 2 nodes:
- AG-NODE1
- AG-NODE2
In the next step we are adding a 3rd Replica on AG-NODE3 to our existing Availability Group, so that we can then demonstrate various Failover scenarios between them. SQL Server Management Studio 2012 provides you here also a Wizard, with which you can accomplish this task. In the first step of the wizard you have to connect to your existing Replicas, because SQL Server must change the security settings on each Replica, so that each Service Account of each Replica has the CONNECT permission to the endpoint used for AlwaysOn. When you are adding a new Replica, and that Replica runs under a separate Service Account, then the Wizard will also create the corresponding login in each other Replica for you. After you have connected to each existing Replica, the wizard provides you a page, where you can actually add the new Replica to the existing Availability Group.
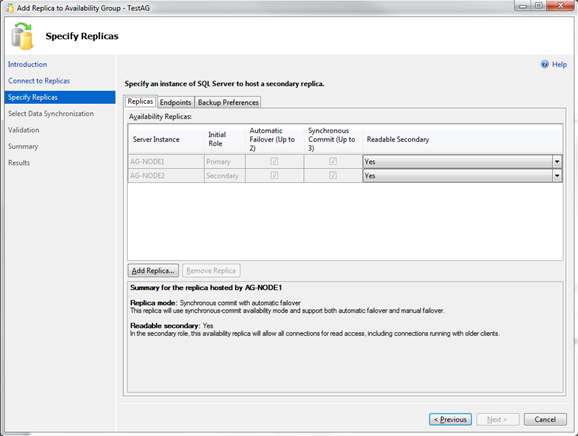
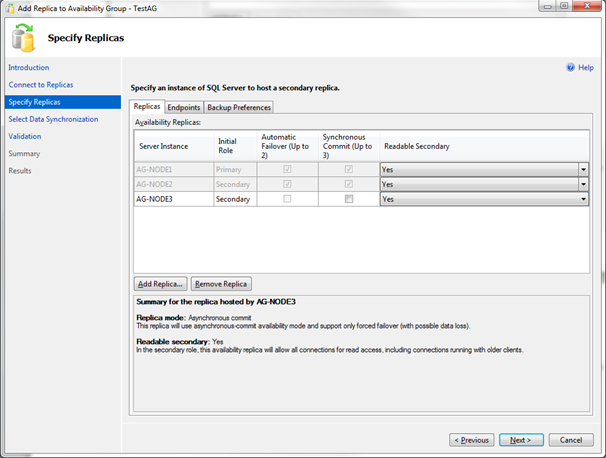
It’s almost the same page as when you are creating a new Availability Group. Here you can again specify if you want to have synchronous/asynchronous commit for the new Replica, if you want to have an Automatic Failover, and if the Replica should allow read only access in the Secondary Role. For the 3rd Replica I have specified Asynchronous Commit and no Automatic Failover, because you can only have an Automatic Failover between 2 Replicas (in my case between AG-NODE1 and AG-NODE2).
In the next step you can configure how the Initial Data Synchronization for the new Replica should happen. Here you have the same 3 options as when you are creating a new Availability Group:
- Full
- Join Only
- Skip Initial Data Synchronization
Please refer back to the last blog postings for more information about the various options. Today I’m assuming that we have already prepared our databases on the new Replica, so I’m using the Join Only option. When you are using that option, you have to restore a Full Backup of your databases with NORECOVERY and all needed Transaction Log Backups with NORECOVERY (since the last Full Backup, when you are not working with Differential Backups). This is the preferred option when you are working with larger databases, where you can’t just take a Full Backup and restore it during the process of adding the new Replica. You just have to make sure that your Transaction Log isn’t backed up in the meantime, because then you also have to restore that backup on your new Replica. When you have added your new Replica to the Availability Group, you can check through the Dashboard if everything is fine with your AlwaysOn deployment.
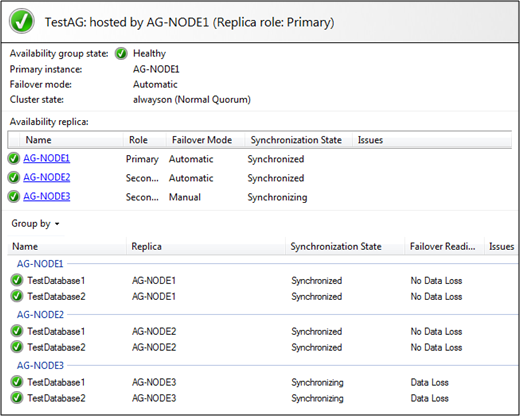
As you can see from the picture the first 2 Replicas are in the Synchronized state, because we are using Synchronous Commit between them. And the 3rd Replica that we have added is in the Synchronizing state, because we are using Asynchronous Commit. That Replica will always remain in the Synchronizing state, as long as you are using Asynchronous Commit. One important thing to mention here is that you have to configure BOTH Replicas for Synchronous Commit to actually get Synchronous Commit. Look at the following table:
|
Primary Synchronous |
Primary Asynchronous |
|
|
Secondary Synchronous |
Synchronous |
Asynchronous |
|
Secondary Asynchronous |
Asynchronous |
Asynchronous |
As soon as one of your Replicas is in Asynchronous Commit, you will get Asynchronous Commit. So you have to configure Both Replicas in the correct way to get the correct behavior. That’s one of the first pitfalls that you will encounter when setting up a new Availability Group: you are just configuring one Replica for Synchronous Commit, and you are wondering why the Synchronization State is not Synchronized. So be aware of that fact!
Note: Normally you are using Synchronous Commit for local High Availability and Asynchronous Commit for remote Disaster Recovery. In our case AG-NODE1 and AG-NODE2 will be in our local data center, and AG-NODE3 will be in a remote data center.
In the next blog posting you will then see how Failovers are working with AlwaysOn – so stay tuned.
Thanks for reading!
-Klaus
3 thoughts on “SQL Server 2012 AlwaysOn Availability Groups – Part 4: Adding new Replicas”
Really nice one, i would like to follow and implement
Excellent series. Can’t wait to try it for myself. Thank you!
This is a great blog and detailed requirements and description for setting up AlwaysOn Group with SQL Server 2012. We know that Clustered virtual machines cannot be part of VMware clusters (DRS or HA) – this was the rule for Clustering any version of SQL server prior 2012. The main reason was interrupted heartbeats. Do we know if SQL Server 2012 AlwaysOn instances can be involved in some kind of VMware clusters (DRS or HA)?
Thanks
Comments are closed.