Since yesterday it is official: I own my first Mac computer – the new MacBook Air that was released a few weeks ago by Apple. I’m already owning the Lenovo W510 notebook for my “serious” SQL Server work (and a few other servers in my rack in the basement of our house), but I wanted to have something small for travelling. Therefore the MacBook Air 13″ is the ideal solution for me. I’ve ordered the MacBook Air with the following hardware configuration:
- 13″ MacBook Air
- Intel i7 2GHz Processor
- 8 GB RAM
- 512 MB SSD
I have just upgraded every piece of hardware to its maximum J. Besides the customized hardware configuration I’ve also bought a VGA adapter (which I really need for my presentations/consulting engagements) and an Ethernet adapter (the MBA has wireless, but I wanted to be sure…). Additionally I have ordered a second power adapter that will always travel with me – the original one will stay at home. In this blog posting I want to share my MacBook Air experience that I have encountered over the first 24 hours, and how easy or hard it was to move from a Windows to a Mac system.
The first problem, with which I was confronted, was after doing the order through the Apple Store. My MBA (MacBook Air) was a CTO one (Configured to Order), which means the MBA was assembled in Shanghai and finally sent to Vienna/Austria. But as I have already mentioned, I had also ordered other hardware like the VGA and Ethernet adapters. My mistake was that I have ordered everything in a SINGLE order! Don’t do this with Apple! They have to merge every single part of your order together and this could take some time, because the adapters were coming from somewhere else in the world… So it took me around 2 weeks until I finally got my MBA. First lesson learned…
My MBA arrived finally yesterday around 2pm, which means I had plenty of time to get familiar with this new device and set it up, as I need it for my day-2-day work. The first amazing thing was when I opened the box in which the MBA was shipped from Shanghai to Vienna. Inside the carrier box you find a very nice box in the traditional Apple white style, where the opening of the box is also a very nice ceremony.
After I have carefully opened the box, I had finally my baby in my hands. It is very lightweight (around 1.3 kg) and the design is just awesome. It took me around a minute to find the On-Key to start the MBA – it’s located in the top right corner of the MBA. After a few seconds the MBA booted, and the configuration screen was already present. In the first step you have to configure your Wireless LAN connection to get a connection to the Internet. That was the easy part, but in the next step you have to select your country/region for your regional settings – it’s the same concept as when you are installing Windows. But hey, I wasn’t able to find Austria in the list box – I have searched for Österreich, Oesterreich, Austria, but I haven’t found it – really strange. So I have selected Germany 😉 I have to check this afterwards…
In the next step you have to enter your Apple ID to connect your MBA with it. You get your Apple ID as soon as you order through the Apple Store. Mainly it’s your email address with a chosen password – it’s the same concept as the Windows Live ID. So I have started to enter my email address, but hey, the MBA has a completely different keyboard layout than a traditional Windows PC! It took me around 2 minutes to find the @ character for entering my email address. On my German keyboard layout this character is on the L key, but you also have to press the ALT – so you have to do ALT + L to get a @. When you know it, it is easy…
After you have configured your Apple ID you have to setup the user account for your MBA. It’s the same as in Windows, where you can also have multiple user accounts. But trust me: I will NOT share this piece of hardware with anyone. You can also choose a picture for your account, but the great thing here is that you can directly make a shot of you from the integrated web cam – Windows doesn’t has such a functionality. After these few steps my MBA was up and running within a few minutes. So it’s not a big deal to get your MBA configured.
But as soon as you enter the Mac desktop everything changes, and you are feeling like an 80-year-old grandpa working the first time in his life with a computer. You are completely lost, and you have no idea where to start. The first thing that I wanted to do was checking which hardware is present in my MBA. But how you can do that? There is no Start Menu, no Control Panel, nothing. The only thing that you have is the so-called Dock at the bottom of your desktop.

The Dock is something similar to the Start Menu in Windows – you can pin your installed applications to the Dock for faster access. By default there are a few applications in the Dock. Your friend here is the 3rd icon – the Launchpad.
With the Lauchpad you get access to all of your installed applications, and there is one application called Utilities and inside it you find System Information. System Information is your friend to find out which hardware the MBA has. Fortunately I had the hardware that I had ordered inside my MBA J. Besides the Launchpad there is also a big difference how started applications are interacting with the desktop. In Windows each application has its own menu bar. Mac OSX uses here another concept: there is one centralized menu bar at the top of your desktop, and this menu bar shows the menus for the current active application. That’s a little bit tricky in the first few hours, but you will get it after some hours.
Closing or shutting down applications on Mac OSX also works a little bit different than on Windows. When you have the window of an application in front of you, you have some icons on the top left side, where you can minimize (yellow button) and maximize (green button) your windows. There is also a red button with an X. For me as a Windows user this means closing the application. But on Mac OSX the application just disappears from the desktop and is running in the background. This means that your application is still in memory and consumes the memory. Over the 3 – 4 hours I have “closed” the applications in this way, until I have encountered through the Activity Monitor that they are still running!
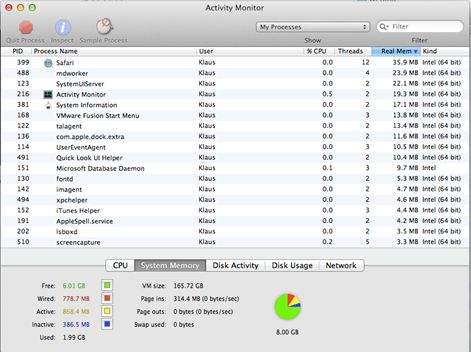
The Activity Monitor itself is nothing else than the Task Manager on Windows. You can see which applications are running, how much memory they are consuming, what your current CPU utilization is, how much traffic you have on the network, and how much space is left on your hard disk. So it is a really very handy tool. After I have seen that I have not closed my applications, I have done some “research” on the Internet: your application is only really closed when when go to the menu bar (on top of your screen), choose the first menu option, and then Quit. This option is really closing your application and cleaning it up from memory. So that’s a huge difference from Windows!
Installing new applications on the MBA also works like a charm. Mac OSX uses here the concept of DMG files. DMG stands for Disk Images, and you can think of it like ISO files. You can download DMG files for software directly from the software vendor. After you have your DMG file on your local hard disk, you can mount them with a double-click inside your MBA, and with a simple drag and drop to your Applications folder you can install the specific application. When you want to uninstall an application, you are just moving it to the Trash Icon in the Dock. That’s so easy compared to Windows. Brent Ozar also has a video, where he describes how you can work with DMG files on a Mac – http://www.brentozar.com/archive/2010/09/how-buy-your-first-mac.
So what software I have currently installed on my MBA:
- Microsoft Office 2011 for the Mac (I’m writing this blog posting in Winword for Mac)
- TweetDeck
- Skype
- Amazon Kindle
- Spotify
As soon as you are installing Microsoft Office 2011, you will also get a Remote Desktop Connection client. With that software it is very easy to connect to your Windows Servers or your Windows based VMs. So I can completely control my HP DL180 G6 that hosts 30+ VMs (for various lab scenarios) directly from my MBA when I’m sitting in the couch. That’s awesome J.
By now I had installed almost every application that I need for my day-2-day life expect SQL Server. Without SQL Server my business would not run ;-). So how can I run SQL Server on a MBA? Mainly you have 3 options:
- Porting SQL Server to Mac OSX (not really a good option)
- Using Windows with Boot Camp
- Using Virtualization
Besides the first (silly) option, running Windows with Boot Camp on a Mac is also a viable solution. The drawback here is that you have to dual-boot your MBA, once for Mac OSX, and once for Windows. So it’s not a real good experience when you want to move a little bit away from Windows (do I have already told you that I’m NOT a big fan of Metro and Windows 8…?). So for me the 3rd option, using a Virtualization software is the best choice, because I can stay in Mac OSX, and run my Windows based applications. When you want to virtualize on Mac OSX, you mainly have 2 paid software choices (besides some freeware applications):
- Parallelism
- VMware Fusion
There is a huge debate going on which software is the better one. For me it was easy to choose the right virtualization software: I have already worked with VMware, and VMware is a huge player in the Virtualization market. Installing VMware Fusion is also very easy, you just download a DMG file, and that’s it! And it costs around € 40, so it’s really cheap. The big surprise for me was, when I actually installed Windows 7 x64. It only took around 15 minutes, and applying SP1 took another 5 – 10 minutes. That MBA is soooo blazing fast!!! Thomas Kejser (http://blog.kejser.org, ex PM in the SQLCAT team) told me that the underlying SSD disk in the MBA can achieve around 300 – 400 MBs/sec. With a SATA 3 notebook (like the Lenovo W510) you are not able to achieve this throughput…
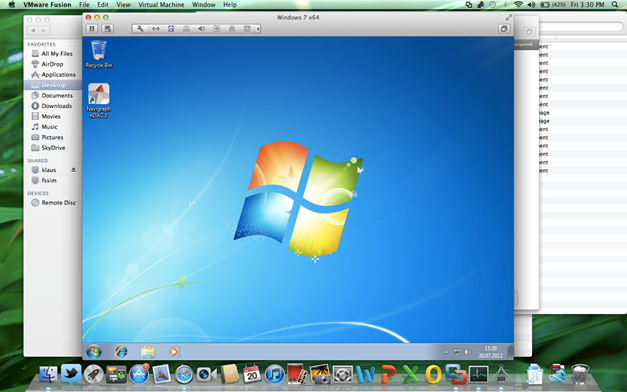
Installing SQL Server 2012, SQL Server 2008 R2 + SP1 also just took around 15 – 20 minutes. I received my MBA around 02:00pm, and I was able to connect to my SQL Server in a VM around 05:45pm – that’s awesome! When you are running VMware Fusion on Mac OSX, you have 2 choices regarding the interaction with the desktop. You can run your VM standalone, which means your VM is a separate window, like you know it from Windows.
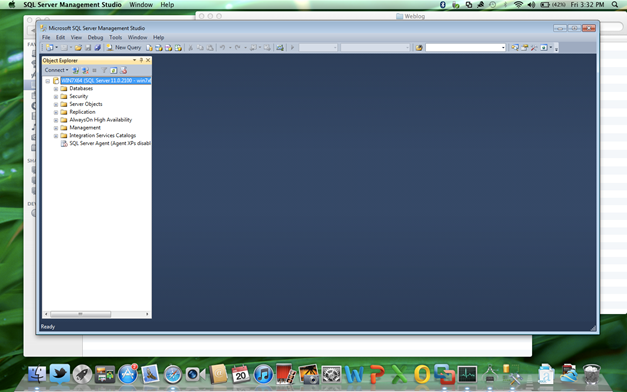
But VMware Fusion also supports Unity. When you enable Unity, the applications inside your VM will be part of your Mac OSX desktop, and you have no idea which application is a Mac OSX native one, and which application is a Windows one (besides the Look and Feel). So the following screenshot shows SQL Server Management Studio directly on the Mac OSX desktop, where I have Unity enabled.
Brent also has a video which goes into more details of this behavior (see http://www.brentozar.com/archive/2010/09/how-buy-your-first-mac). So when you are using your VMs with Unity, you don’t really care about Windows anymore. When you shut down your MBA, VMware Fusion will save the state of your VM, and when you restart the MBA, your VM will be also started. You can also directly start applications from your Windows based VM through the menu bar on the desktop:
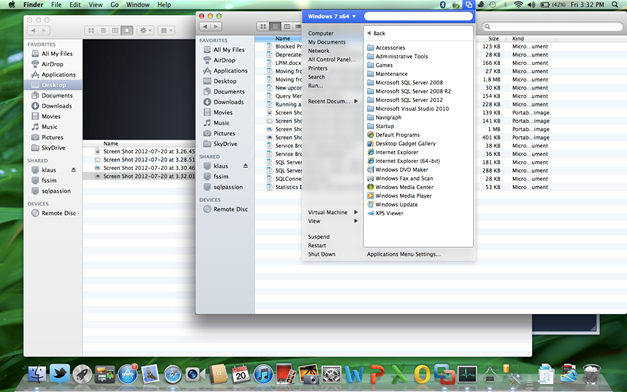
When the VM isn’t yet booted up, VMware Fusion will boot it, and will finally launch your Windows application. With Unity your VM (with another OS on it) with its applications and Mac OSX are just melting together. You can stay in Mac OSX, but you still have the choice to execute Windows based application, without ever leaving Mac land anymore J.
Printing from the MBA is also very easy. I have 2 printers at home, and installing them on Windows is sometimes a little bit PITA, because you need special drivers for Windows, and sometimes Windows is finding them. So I thought: installing my printers on the MBA will be impossible. Wrong! You just turn on your printer, Mac OSX will detect them, install the correct driver (without ANY interaction from your side), and finally you can use your printer. It took me around 5 minutes to install both printers – on Windows it took me hours to do the same work, sometimes without any success.
The last thing with which I’m currently struggling is how to synchronize my data between my Lenovo W510 and the MBA. My goal here is as follows: I want to use the MBA for the basic stuff that I’m doing:
- Writing (Articles, Blog Postings)
- Presenting “basic” SQL Server sessions (no HA/DR stuff)
- Doing my Consulting/Training Stuff
- Internet Surfing
- Accessing my Lab VMs, that are running on a HP DL180 G6
As soon as I need more power, or when I have to take my Hyper-V VMs with me, I’m planning to use my Lenovo W510, like for my upcoming SQLPASS precon in November, where I’m talking a whole day about Practical SQL Server Troubleshooting. Such sessions/workshops/precon’s can’t be done on a MBA, there is just too less power and hardware for it. But I’m still thinking about accessing the VMs on the Lenovo W510 through a Remote Desktop Connection, instead of working directly on it – but I haven’t yet done a final decision on that. I have to do some “Proof-Of-Concepts” about that idea…
But as soon as I’m working on 2 computers, there is a lot of data that must be synchronized between both of them. Currently I’m looking into Microsoft SkyDrive for synchronizing almost all of my data between both machines (besides videos like the MCM training videos). The great thing about SkyDrive is that you can upgrade to 100GB storage for just around € 40 per year. That’s not too much, and this approach will also give you a disaster recovery solution, because you are storing your critical data somewhere else (Yes, I’m doing almost regular backups of my stuff, but those backups remain in our house… in a safe location…). I’ve also looked into DropBox, but it’s just too expensive, you can get it cheaper with SkyDrive. SkyDrive provides you the necessary synchronization appliations for both Windows and Mac OSX. The crazy thing here is that the application works without any problems on Mac OSX, but crashes every few minutes on my Windows machine. I have to investigate this a little bit more….
Wow, I’ve now almost finished writing my 1st blog posting on the MBA. This was also a test drive for WinWord on the Mac, but I really liked it. It’s a little bit different – especially the keyboard shortcuts – but by the end of the day you will like it. The amazing thing about the last 24 hours was also that you don’t hear the fan of the MBA. The MBA is just silent. The only time when I heard it was when I have installed my Windows VM. Even when I run the VM, I can’t hear the fan – that’s also amazing.
So, I hope you have enjoyed this blog posting, and as you have seen it’s almost very easy to move from a Windows system to a Mac OSX system. Of course, a lot of things are different, but by the end of the day, both systems are just OSes with pro’s and con’s. It just takes some time to get familiar with it. But Mac OSX is really a great alternative to Windows 8, when you don’t want to have that silly touch/metro stuff on your working machine…
Thanks for reading!
-Klaus
3 thoughts on “Moving from Windows to Mac – a true love story”
Hi Klaus,
Thanks for sharing these experiences, I am also considering to move to Mac and this is very helpful.
btw. If I’m not mistaken, VMWare Fusion is also capable of running your bootcamp partition as a VM!
Regards,
André
Hello André,
Thanks for your comment.
I don’t know if that is possible with VMware Fusion, but I think I have read something about it…
I have not played around with Boot Camp, and I’m also not planning to do it – I’m completely happy with my current setup 🙂
-Klaus
Thanks for sharing. I might need this in the future 🙂
Now you can take your SQL Server in that Mac and go to Starbucks and look like a cool kid with a Mac!
Comments are closed.