In this comprehensive technical walkthrough, I’ll take you through a real-world journey of troubleshooting and tuning a high-performance 40 Gbit Ethernet setup using Intel XL710 network cards connected through a Cisco Nexus 3064 switch. The goal was simple but challenging: to achieve near line-rate performance using iperf3 between two Linux (Proxmox) systems.
When I first started testing the 40G link, I encountered a very common and frustrating issue: despite having all the right hardware, iperf3 tests only delivered around 11 Gbit/s. This was far below the expected ~38–39 Gbit/s real-world performance. What followed was an in-depth debugging session that involved diving into PCIe configurations, enabling Jumbo Frames, tuning the Linux network stack, and understanding CPU and interrupt behavior at a granular level. This article documents that process as a narrative, sharing the lessons learned and how to avoid the same pitfalls.
Discovering the Bottleneck: Underwhelming Performance
It all began with a standard iperf3 test between two freshly installed Linux (Proxmox) systems equipped with Intel XL710 NICs. These cards support 40 Gbit Ethernet, and the cabling was solid. The Cisco Nexus 3064 was correctly configured, and the link was up. Running the test looked like this:
iperf3 -c <server_ip>But the results were disappointing – only about 11 Gbit/s, far short of the 40G target. My first instinct was to blame the network, but link counters and interface stats were clean. It was time to go deeper.
Step 1: Understanding PCIe Bandwidth Limits
High-speed NICs are heavily dependent on the available bandwidth of the PCIe slot they are installed in. To confirm whether the NIC had enough PCIe lanes and speed, I checked the system slot information using dmidecode:
dmidecode -t slotOne of the NICs was installed in a slot with the following specs:
Type: x4 PCI Express 2 x8At first glance, this looked okay, but here’s the key insight: PCIe Gen 2 supports 5 GT/s per lane, and due to encoding overhead, this yields ~500 MB/s per lane. For x4 lanes, that’s only 2 GB/s, or ~16 Gbit/s of usable bandwidth – not enough for a 40G NIC. So, I moved the NIC to another available slot labeled as:
Type: x8 PCI Express 3
This was a significant upgrade. PCIe Gen 3 supports 8 GT/s per lane, with an effective throughput of around 985 MB/s per lane. In an x8 configuration, this meant 7.88 GB/s, or ~63 Gbit/s, which is more than sufficient for a 40G card. I confirmed the change with:
lspci -vv -s 0a:00.0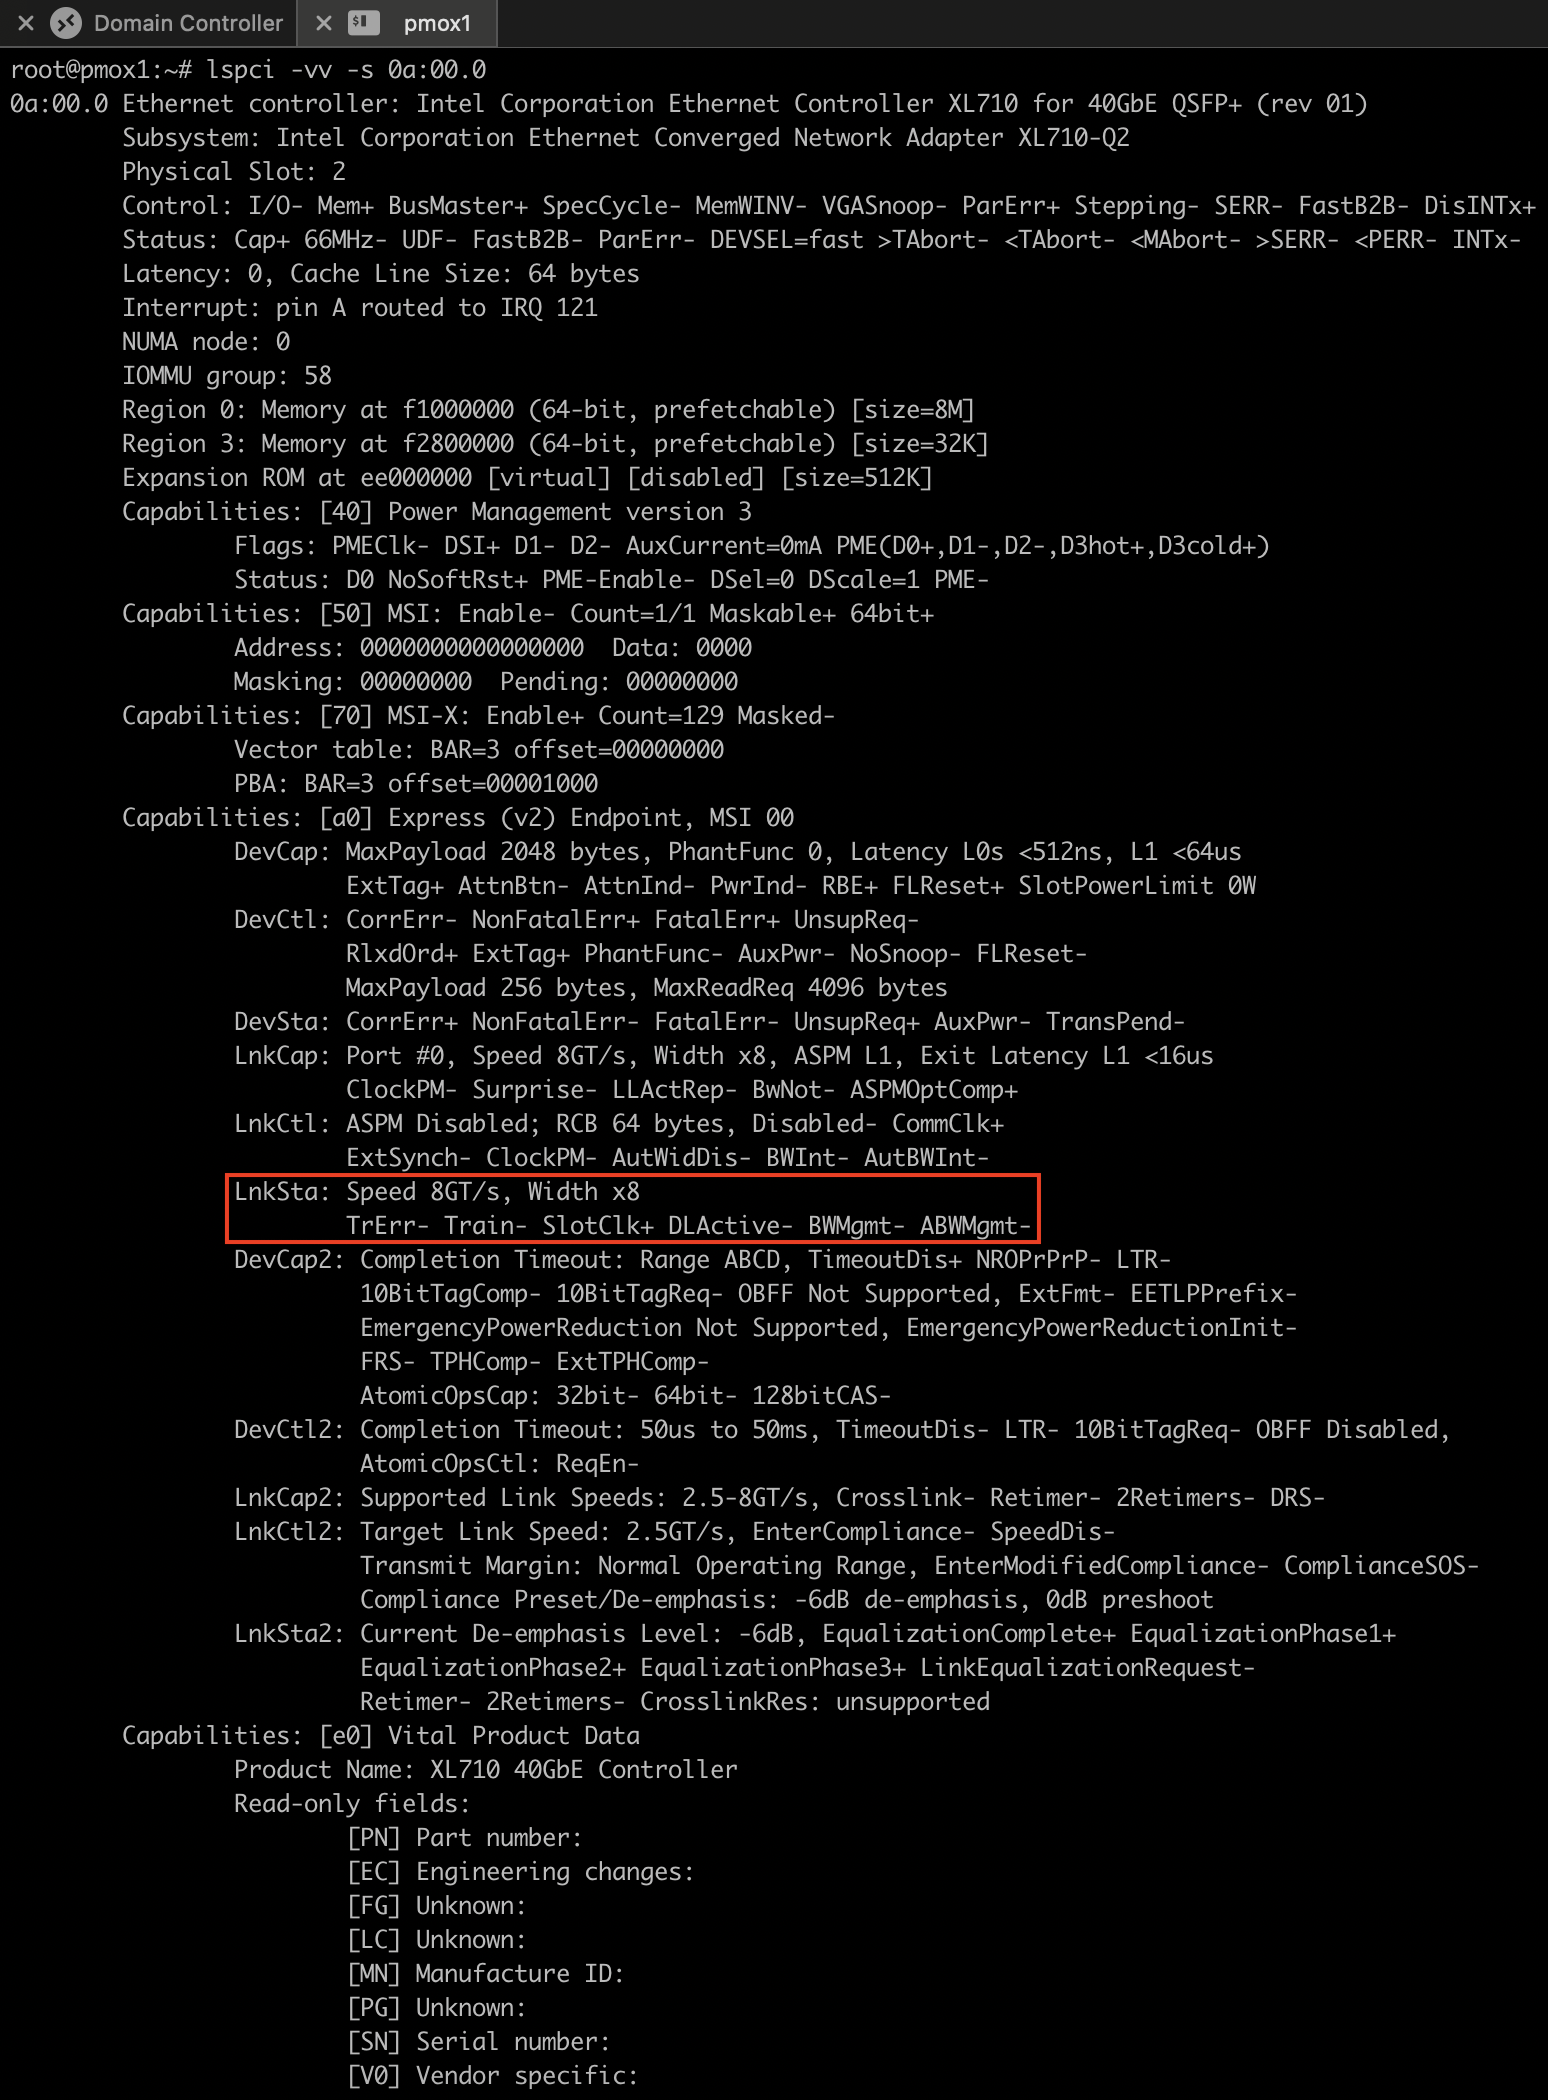
With the card now properly connected to a high-speed slot, I expected better performance.
Step 2: Enabling Jumbo Frames
To move large volumes of data efficiently, Jumbo Frames are essential. Without them, the CPU has to process more packets per second due to the smaller default MTU of 1500 bytes. Enabling Jumbo Frames raises the MTU to 9000 bytes, drastically reducing CPU overhead. On the Linux (Proxmox) hosts, I enabled Jumbo Frames like this:
ip link set ens2f0np0 mtu 9000To verify, I used:
ip link show ens2f0np0
The result showed an MTU of 9000. But this alone wasn’t enough. The Cisco Nexus 3064 switch also needed to be configured to allow Jumbo Frames – which I have already described some time ago. To test if Jumbo Frames were really working end-to-end, I ran:
ping -s 8972 -M 192.168.15.102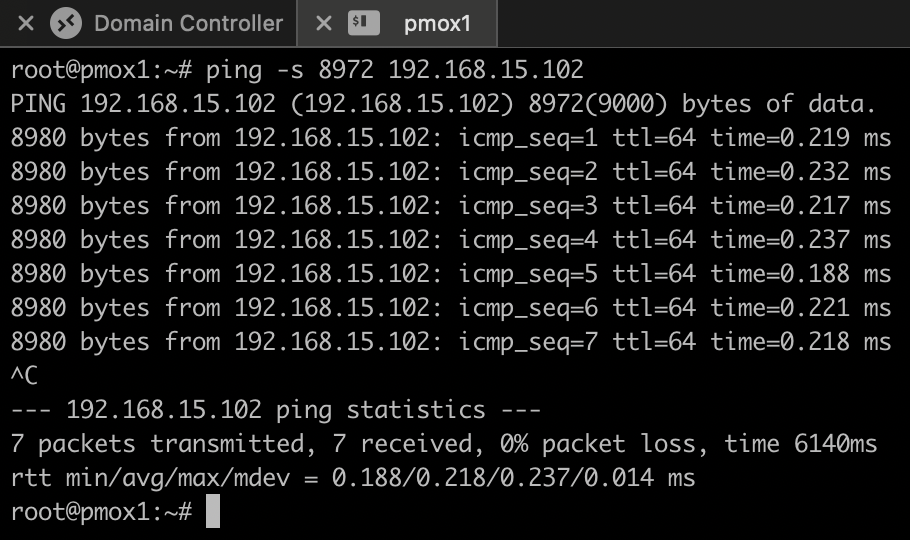
This uses a payload size of 8972 bytes (9000 MTU minus headers) and ensures that no fragmentation occurs. The pings succeeded, confirming proper jumbo frame support.
Step 3: Tuning iperf3 and the Linux Network Stack
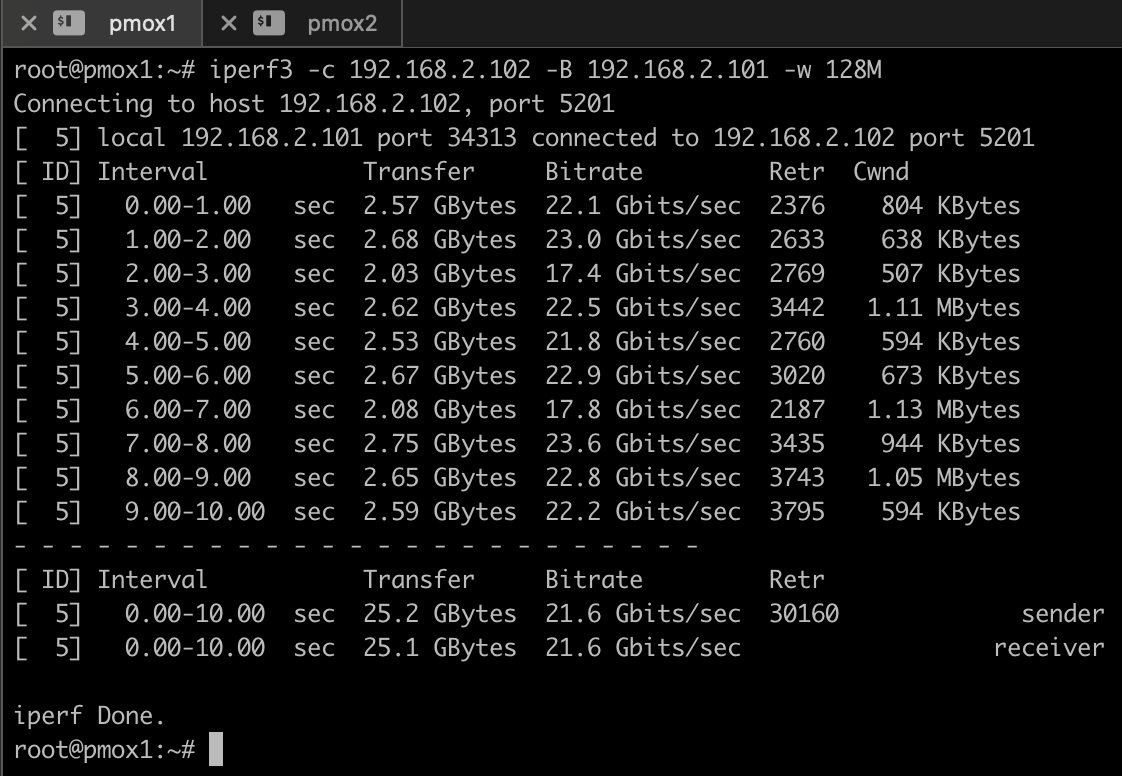
The default behavior of iperf3 is to run a single stream – and it’s single-threaded. On high-speed links, a single thread can max out one CPU core and become a bottleneck. I used the -P flag to run multiple parallel streams:
iperf3 -c <server_ip> -P 8 -w 4M -t 30I also adjusted the TCP window size with the -w flag. But this created a new issue:
iperf3: error - socket buffer size not set correctlyThis meant the Linux kernel refused to allocate the requested socket buffer. I resolved this by increasing system-wide buffer limits:
sysctl -w net.ipv4.tcp_wmem="4096 87380 67108864"
sysctl -w net.ipv4.tcp_wmem="4096 87380 67108864"
sysctl -w net.ipv4.tcp_wmem="4096 87380 67108864"
sysctl -w net.ipv4.tcp_wmem="4096 87380 67108864"
These changes ensured that larger TCP windows could be used without errors.
Step 4: Receive Side Scaling (RSS) and IRQ Optimization
With higher packet rates, a single CPU core can’t process everything. That’s where RSS (Receive Side Scaling) comes in. It allows NICs to distribute network processing across multiple CPU cores using multiple queues. With higher packet rates, a single CPU core can’t process everything. Receive Side Scaling (RSS) allows NICs to distribute network processing across multiple CPU cores using multiple queues. The Intel XL710 uses the i40e driver, which supports RSS. I checked with:
ethtool -i ens2f0np0Then I verified RSS was active:
ethtool -x ens2f0np0
grep ens2f0np0 /proc/interrupts
To make sure more queues were enabled, I set:
ethtool -L ens2f0np0 combined 8After this, I could see 8 queues in /proc/interrupts, and they were incrementing during network activity – a sign that multiple cores were handling packets.
To optimize interrupt distribution, I installed and enabled irqbalance:
sudo apt install irqbalance
sudo systemctl enable --now irqbalance
This service ensures that IRQs are distributed across CPU cores dynamically.
Step 5: NUMA Awareness
On systems with NUMA (Non-Uniform Memory Access), the CPU and memory region closest to the PCIe slot should be preferred. I found the NUMA node for my NIC with:
cat /sys/class/net/ens2f0np0/device/numa_nodeTo pin iperf3 to that NUMA node, I used:
numactl --cpunodebind=1 --membind=1 iperf3 -c <server_ip> -P 8 -w 4MThis further improved performance consistency by keeping memory and CPU access local to the NIC’s domain.
Summary
After all these optimizations, iperf3 reports now a throughput of about 20 – 25 Gbit/s, consistently and reliably. CPU usage was spread across multiple cores, interrupts were balanced, and no packet drops were observed.
I’m still not perfectly happy with the result, but it is much better as initially with a throughput of around 11 Gbit/sec (because the NIC was in the wrong PCI slot). If you have tips and suggestions for further improvements, please leave me a comment.
Thanks for your time,
-Klaus